Some Ulysses III Themes for Marked
Let’s keep playing around with Ulysses III, shall we? I rather enjoy writing in it, and I like seeing the finished, formatted version of my work in Marked. I created some custom themes for Marked to match Ulysses’ color schemes (available for download at the bottom of this post). First, though, a few words on using Marked with Ulysses.
Here’s how The Soulmen answer “Is there a Markdown preview?” in their FAQ:
In External Sources, you can directly preview Markdown files. Right-click on a sheet and open it in your favorite Markdown processor. We can recommend Brett Terpstra’s wonderful Marked app for this.
As I said in my review, external sources don’t really offer you the full Ulysses experience. The product page is careful to mention that Marked is only supported with external sources, since they’re just loose documents on your hard drive; they would work with Marked no matter what. However, I can be less cautious: only external sources fully support Marked preview.
Full Marked support, by my measure, means the document will update live while you’re editing it. At present Marked does not support opening the raw text document at the core of your Ulysses sheet, so live updating is out.1 You can, however, export the current sheet directly to Marked, where it will be formatted like any other Markdown document. You won’t be able to live update as you type, but you can manually push your edits to Marked.
All you have to do is access the quick export popover in the top right-hand corner of Ulysses. When you click it, select the text tab, then make sure you Markdown selected as your format. Hover over the “Open In…” button so a down-arrow appears just to the right of it. A list of available editors will pop down. Choose Marked.
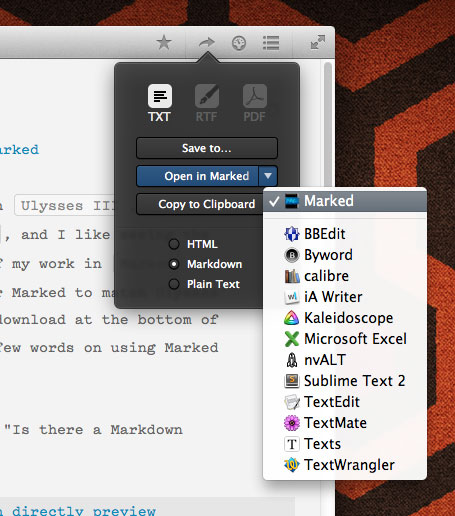
Ulysses Quick Export
Marked will open up your current sheet. Doing the same thing again will push any new edits to the document in Marked. The “Open In…” button will retain the previous app you used for quick export, which in my case will almost always be Marked. Now I can expedite pushing changes to Marked by hitting ⌘6 to bring up the quick export popover. If the middle button is highlighted blue and says “Open in Marked” all I have to do is hit return and it will push the changes. If not I can use directional arrows to move to the correct button.
This works on glued sheets as well. You can also highlight a bunch of sheets and do a quick export; Marked will see them as one long document, just as you see them in Ulysses.
In practice I rarely use live updating in Marked anymore. I only use it to read through longer pieces in a proportional typeface, to get myself in a proofreading mood. I’d like to see live Marked support come in a future update, but I’m perfectly happy knowing I can get to it from the keyboard in two clicks.
Now about those themes. My personal favorite is the Freestraction theme that ships with Ulysses. It’s easy on the eyes in both light and dark modes, so I decided to copy it for two custom Marked themes. Here they are:
Ulysses Freestraction Light

Ulysses Freestraction Dark
Download Ulysses Themes for Marked
The following installation instructions are lifted right off of the Marked product page (at the very bottom):
- Save the CSS file to a safe place such as ~/Library/Application Support/Marked/Custom CSS
- In Marked Preferences, go to the Styles pane
- Use the plus button to add a new style, locate your CSS file and hit “OK”
- Your style will be named based on the name of the CSS file, and will now be available in the Style dropdown menus
Happy writing.
Further Reading:
-
I can tell you that I actually have gotten live preview working but it’s difficult to get going, potentially corruptive and, as Max from The Soulmen would probably yell at me, it’s UNSUPPORTED. ↩︎